Learn Swift & SwiftUI: Create a Simple Todo App in 5 Minutes with our 2023 Step-by-Step Tutorial
March 28, 2023
PouyaSadri
Want to learn Swift and SwiftUI? Our tutorial will teach you how to create a Todo app in just 5 minutes. Get started today!
Tutorial
SwiftUI
Mobile app development
Are you interested in learning how to create a simple Todo app using Swift and SwiftUI? Look no further! In this tutorial, we will guide you through the process step-by-step, teaching you the fundamentals of Swift and SwiftUI along the way.
Swift is a powerful programming language used for developing iOS, macOS, watchOS, and tvOS applications. SwiftUI, on the other hand, is a framework designed by Apple to make building user interfaces easier and more intuitive than ever before.
In just five minutes, you'll have a fully-functional Todo app that you can use to keep track of your tasks and stay organized. Follow along with our easy-to-follow tutorial and start building your own iOS apps today!
By the end of this tutorial, you'll have a solid understanding of how Swift and SwiftUI work, and you'll be ready to start exploring more advanced features of these powerful tools. So what are you waiting for? Let's get started!
Let’s get started
You can also Watch the full tutorial video on my YouTube channel
Step 1: Creating "TodoItem" Struct
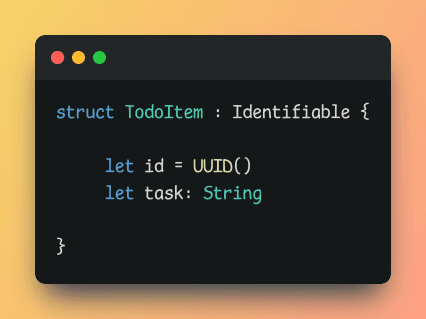
The TodoItem struct is a simple but powerful way to organize and manage tasks in your app. With just a few lines of code, we can create a unique identifier for each task and store the task description as a string.
In the first line of our code, we define our TodoItem struct with the struct keyword. Next, we use the Identifiable protocol to create a unique identifier for each item. This allows us to easily track and manage tasks within our app.
Inside the struct, we define two properties: id and task. The id property uses a UUID to create a unique identifier for each task. The task property is a string that represents the description of the task.
Overall, this simple code snippet demonstrates the power of Swift and SwiftUI for creating efficient and organized apps. By leveraging the built-in features of Swift, we can easily manage and manipulate data within our app. Try implementing the TodoItem struct in your own app to see how it can improve your user experience!
Step 2: Understanding @State and Arrays in SwiftUI
When you're building a Todo app in SwiftUI, you'll need a way to store and manage your list of tasks. In this tutorial, we'll explore how to use the @State property wrapper and arrays to manage a list of TodoItem structs.
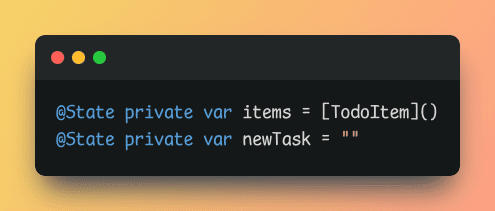
In the first line of our code, we define a private @State property called items. This property is an array of TodoItem structs, which we can use to store our list of tasks. The @State property wrapper allows us to modify this array from within our view, and SwiftUI will automatically update the UI to reflect any changes we make.
Next, we define another private @State property called newTask. This property is a string that represents the text entered by the user when they add a new task. We can use this property to update the items array when the user taps the "Add" button.
By using @State and arrays, we can easily manage and update our list of tasks in real time. Try implementing this code snippet in your own Todo app to see how it can improve your user experience and help you stay organized!
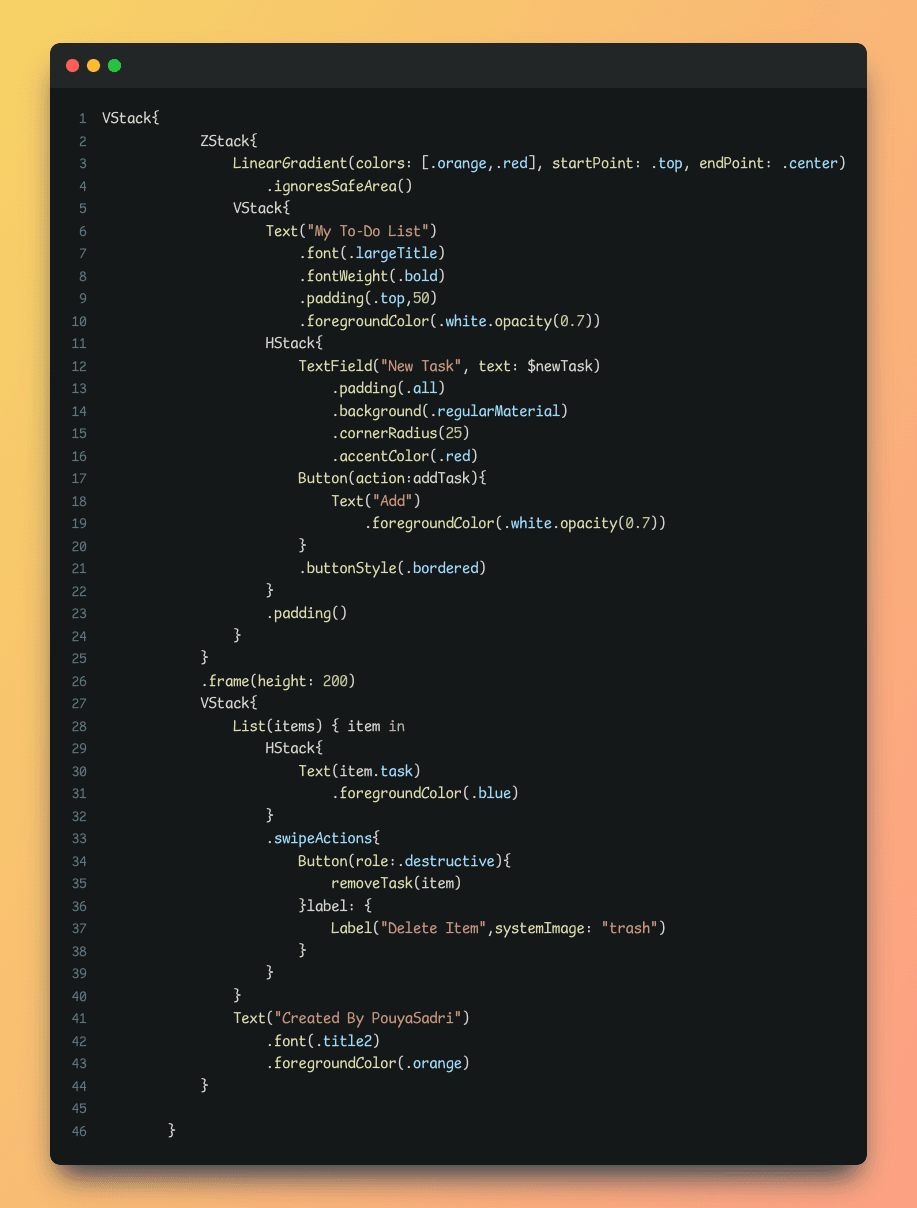
Step 3: Building a Stylish Todo App UI with ZStack, LinearGradient, and VStack

We'll use the ZStack, LinearGradient, and VStack views to create a visually appealing layout with a gradient background and a form for adding new tasks.
First, we'll create a ZStack view to stack our UI elements on top of each other. Inside the ZStack, we'll add a LinearGradient view with two colors, .orange and .red, and we'll use the ignoresSafeArea() modifier to make the gradient fill the entire screen.
Next, we'll add a VStack view to organize our UI elements vertically. Inside the VStack, we'll add a Text view with the title "My To-Do List" in large font and bold style. We'll also add a HStack view with a TextField and a Button to allow the user to add new tasks.
The TextField uses the $newTask binding to update the newTask string property when the user types a new task. We'll use the padding modifier to add some spacing around the TextField, and we'll apply the .regularMaterial and .cornerRadius modifiers to give the TextField a rounded and material-style appearance. We'll also set the accentColor to .red to match the gradient colors.
The Button uses the addTask function as its action, which we'll define elsewhere in our code. We'll use the foregroundColor modifier to set the text color to white with some opacity, and we'll apply the .bordered button style to give it a rounded outline.
Finally, we'll use the padding modifier to add some spacing around the VStack, and we'll set the entire ZStack to a fixed height of 200 points using the frame modifier.
With just a few lines of code, we've created a sleek and modern UI for our Todo app. Try implementing this code snippet in your own app to see how it can improve your user experience and make your app stand out!
Step 4: Building a Todo List with a Swipe-to-Delete Feature
We'll use the VStack, List, and HStack views to organize and display our tasks, and we'll add swipe actions to allow the user to delete tasks with a simple swipe.
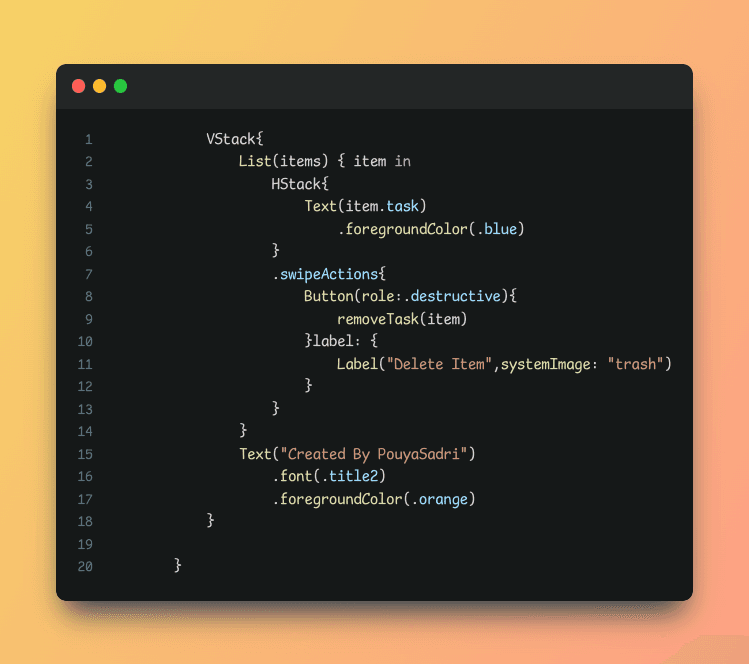
First, we'll create a VStack view to organize our UI elements vertically. Inside the VStack, we'll add a List view to display our items array of TodoItem objects. We'll use the items array as the data source for our List, and we'll use the item variable to represent each individual TodoItem object in the list.
Inside the List, we'll add an HStack view to display the task property of each TodoItem object. We'll use the foregroundColor modifier to set the text color to blue for better visibility.
Next, we'll add a swipeActions modifier to the HStack view to add a swipe-to-delete feature. The swipeActions modifier takes a closure with a Button view as its argument. We'll use the role parameter of the Button to set its role to .destructive, which will give it a red color and indicate that it's a destructive action. We'll use the removeTask function as the action for the Button, which we'll define elsewhere in our code. We'll use the Label view to display the text "Delete Item" with a trash can icon from the system images.
Finally, we'll add a Text view with the author's name and a font modifier to set its size to title2 and a foregroundColor modifier to set its color to orange.
With just a few lines of code, we've created a simple Todo app with a swipe-to-delete feature that allows the user to easily manage their tasks. Try implementing this code snippet in your own app to see how it can improve your user experience and make your app stand out!
Step 5 : Warping Step 3,Step 4 in a VStack
Step 6: Adding a New Task to Your Todo List
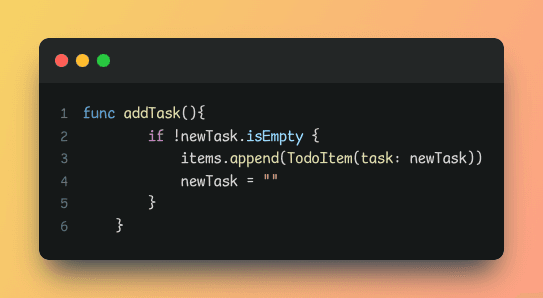
We'll use the addTask function to create a new TodoItem object and add it to our items array, which we'll use as the data source for our List view.
The addTask function takes no arguments and returns no value. Inside the function, we first check if the newTask variable is not empty. If it's not empty, we create a new TodoItem object with the task property set to the value of newTask, and we append it to our items array. We then set the value of newTask back to an empty string, which will clear the TextField where the user enters their new task.
We'll call the addTask function when the user taps the "Add" button in our app. To do this, we'll add a Button view with an action parameter that calls the addTask function. We'll use the Text view to set the button text to "Add", and we'll use the foregroundColor modifier to set the text color to white for better visibility. We'll also use the buttonStyle modifier to set the style of the button to .bordered, which will give it a subtle border.
With just a few lines of code, we've added the ability to add new tasks to our Todo app using SwiftUI. Try implementing this code snippet in your own app to see how it can improve your user experience and make your app stand out!
Step 7 : Removing a Task from Your Todo List
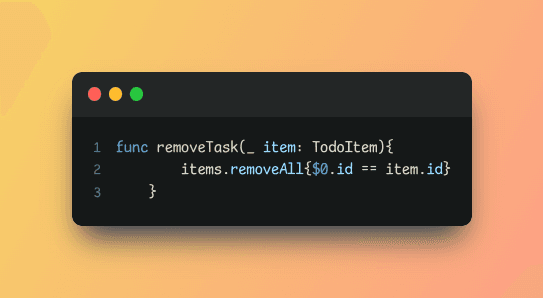
We'll use the removeTask function to remove a TodoItem object from our items array based on its id property.
The removeTask function takes one argument, which is the TodoItem object we want to remove. Inside the function, we use the removeAll method on the items array to remove all elements that match the closure condition, which in this case is that the id property of the element matches the id property of the item passed to the function.
We'll call the removeTask function when the user swipes left on a task in our app to reveal the delete action. To do this, we'll add a swipeActions modifier to our HStack view that contains the Text view for displaying the task. We'll use the Button view with a role parameter set to .destructive to indicate that this button will perform a destructive action. We'll also use the Label view to provide an accessible label for the button that says "Delete Item" and displays a trash icon from the SF Symbols library.
With just a few lines of code, we've added the ability to remove tasks from our Todo app using SwiftUI. Try implementing this code snippet in your own app to see how it can improve your user experience and make your app stand out!
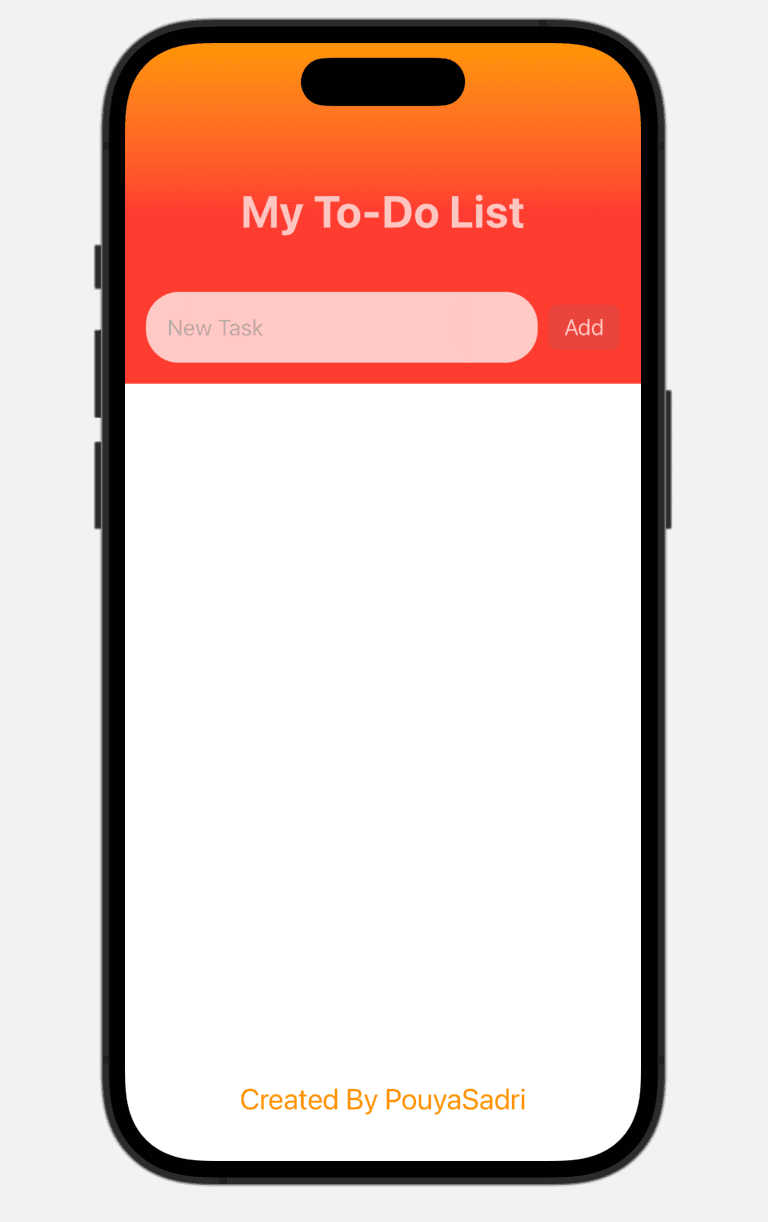
The Final result :
If you're into Swift and creating iOS apps, you definitely don't want to miss out on my tutorials! Head over to my blog and YouTube channel to learn more.
Creating QR Codes in SwiftUI: A Step-by-Step Guide 2023
How to Add Gradients to Your SwiftUI App: A Step-by-Step Guide
Create Custom Tab Bar in SwiftUI for iOS 15 and Beyond: A Step-by-Step Guide